
Recently I’ve been picking up work on my Jetson Posture Monitor project again. I completely started over with the goal of making the whole project way more modern and just cooler in general. The Jetson Posture Monitor is a service that watches my desk posture with a camera on an NVIDIA Jetson and nudges me when I slouch. A self-trained YOLO classifier labels each frame as good/bad posture. Hint: Stay tuned for updates on this! 😉
One part of making everything cooler and better is to implement a proper way of handling everything around YOLO vision model training. This includes dataset handling and versioning, experiment tracking and model versioning for example. During v1 of the posture monitor project I have manually copied raw training data, training datasets and models between the Jetson and my Mac. And if I am honest, this was a complete PITA.
I always found the idea of MLOps interesting, and since my day job is Azure-heavy, I decided to use Azure ML to track my experiment and models. Sadly, my sponsored Azure subscription has no GPU quota, and cloud GPU compute isn’t worth it for a hobby project. Because of this, training has to run locally on my Mac.
So the problem was: train locally on my Mac, but keep experiment and model tracking centralized in Azure ML. The fix is MLflow — point its tracking URI at the workspace and local runs land there as jobs, no cloud compute needed. This post shows how to set that up for YOLO training and what the result looks like in Azure ML.
NOTE: The entire code shown below can also be found in this GitHub gist: https://gist.github.com/denishartl/0a59b7c606d783f849654a2a6430cab5
Disclaimer before we dive in: I am NOT a professional in any way when it comes to MLOps, Azure ML Workspace, etc. - I am just talking about my experiences, and what works for me. Don’t sue me, please.
Components
There are some components involved to make all of this work, so I want to walk through and explain them. This should make it easier to understand everything I explain after.
- MLflow: An open-source tool for tracking ML experiments. It helps to log parameters, metrics, models, … to a tracking server (Azure ML Workspace in this case).
- MLTable: Azure ML’s dataset definition format. A small YAML file which tells Azure ML how to load a dataset (which paths, transformations, …).
- Azure ML Workspace: The top-level Azure ML resource acting as the central hub for all of the ML work for a project.
- Azure ML Dataset: A versioned, immutable registration of an MLTable. Pins the exact set of blob URIs a model was trained on — though the immutability covers the manifest, not the image bytes it references.
- Azure ML Model Registry: Versioned storage for trained ML models inside of Azure ML Workspace.
- Azure Blob Storage: Central blob storage service where the actual training images live.
Workflow
First I want to explain the workflow I am currently using for model training in my posture monitor project. This should provide some context on how and when I work and interact with Azure ML Workspace to make the insights later easier to understand.
Dataset preparation
The workflow starts by preparing the train/test/val split for the dataset. There is more data actively being collected and labeled, so the dataset grows with each training run. Because of this, new splits and dataset versions need to be prepared with each training run. To ensure the same image always lands in the same bucket as the dataset grows, a deterministic split is applied based on the hash of the blob name. This ensures images don’t spill between buckets. Once an image is a validation image, it stays one, while new images just get distributed across the buckets.
This split is important to keep the dataset leak free (leak = training data leaking into validation data, which means the YOLO vision model will get tested on data it was previously trained on). Renaming blobs can break this, but as this is a small personal project, the risk is acceptable.
import hashlib
from collections import Counter
from azure.identity import DefaultAzureCredential
from azure.storage.blob import ContainerClient

container_client = ContainerClient(
    account_url=f'https://{STORAGE_ACCOUNT}.blob.core.windows.net',
    container_name=CONTAINER,
    credential=DefaultAzureCredential(),
)

# Deterministic, content-based split: the bucket is a hash of the blob name, so an image always
# lands in the same split. Adding images never moves an existing one between splits, which keeps
# the test set leak-free as the dataset grows across versions. (hashlib, not the built-in hash(),
# because hash() is salted per process and would not be reproducible.)
def split_for(blob_name):
    bucket = int(hashlib.md5(blob_name.encode()).hexdigest(), 16) % 100
    if bucket < 70:
        return 'train'
    if bucket < 85:
        return 'val'
    return 'test'

# Each labelled blob is classified/<label>/<file>; the label is the folder name.
records = []  # (blob_name, label, split)
for blob in container_client.list_blobs(name_starts_with=CLASSIFIED_PREFIX):
    parts = blob.name.split('/')
    if len(parts) == 3 and parts[2]:
        records.append((blob.name, parts[1], split_for(blob.name)))

print(f'{len(records)} labelled images')
print('class distribution:', dict(Counter(label for _, label, _ in records)))
print('split distribution:', dict(Counter(split for _, _, split in records)))
Next, I prepare the MLTable- and manifest-file. MLTable is used to tell Azure ML how to read the manifest.jsonl file. manifest.jsonl contains an explicit list of every training image, it’s blob URL and which split/bucket it belongs to.
MLTable authoring is happening by hand because I did not find a way to install the mltable Python package on Apple Silicon Mac.
The code to prepare those two files looks like this:
import json
import time
import os

def blob_uri(blob_name):
    return f'wasbs://{CONTAINER}@{STORAGE_ACCOUNT}.blob.core.windows.net/{blob_name}'

VERSION = time.strftime('%Y.%m.%d.%H%M%S', time.gmtime())
manifest_dir = f'./posture_{VERSION}'
os.makedirs(manifest_dir, exist_ok=True)

# Explicit JSON-lines manifest: one frozen row per image (URI + label + split).
manifest_path = os.path.join(manifest_dir, 'manifest.jsonl')
with open(manifest_path, 'w') as f:
    for name, label, split in records:
        f.write(json.dumps({'path': blob_uri(name), 'label': label, 'split': split}) + '\n')

# Hand-authored MLTable file (the mltable package has no Apple Silicon build; see ADR 0009).
# The file must be named exactly "MLTable" (no extension).
mltable_yaml = '''$schema: https://azuremlschemas.azureedge.net/latest/MLTable.schema.json
type: mltable
paths:
  - file: ./manifest.jsonl
transformations:
  - read_json_lines:
      encoding: utf8
      invalid_lines: error
      include_path_column: false
'''
with open(os.path.join(manifest_dir, 'MLTable'), 'w') as f:
    f.write(mltable_yaml)

# Verify: show the first few manifest rows.
for line in open(manifest_path).readlines()[:5]:
    print(line.strip())
Here are some lines extracted from a prepared manifest.jsonl file, listing every single image I use in my dataset.
{"path": "wasbs://posture-detection@stdhposturemonitor.blob.core.windows.net/classified/bad_posture/2025-12-22_16-53-23.jpg", "label": "bad_posture", "split": "test"}
{"path": "wasbs://posture-detection@stdhposturemonitor.blob.core.windows.net/classified/bad_posture/2025-12-22_16-53-52.jpg", "label": "bad_posture", "split": "train"}
{"path": "wasbs://posture-detection@stdhposturemonitor.blob.core.windows.net/classified/bad_posture/2025-12-22_16-53-58.jpg", "label": "bad_posture", "split": "train"}
{"path": "wasbs://posture-detection@stdhposturemonitor.blob.core.windows.net/classified/bad_posture/2025-12-22_17-03-00.jpg", "label": "bad_posture", "split": "val"}
{"path": "wasbs://posture-detection@stdhposturemonitor.blob.core.windows.net/classified/bad_posture/2025-12-22_17-09-00.jpg", "label": "bad_posture", "split": "train"}
The third step to prepare the dataset is to register it as an immutable version in the Azure ML Workspace. At this point, the dataset exists as an immutable version in Azure ML Workspace and can be used further. Tags provide some additional metadata information about the dataset.
from azure.ai.ml import MLClient
from azure.ai.ml.entities import Data
from azure.ai.ml.constants import AssetTypes
from azure.identity import DefaultAzureCredential

ml_client = MLClient(DefaultAzureCredential(), SUBSCRIPTION_ID, RESOURCE_GROUP, WORKSPACE)

class_dist = Counter(label for _, label, _ in records)
split_dist = Counter(split for _, _, split in records)
asset = Data(
    path=manifest_dir,
    type=AssetTypes.MLTABLE,
    name=DATA_ASSET_NAME,
    version=VERSION,
    description='Frozen in-place manifest of labelled posture-detection images with a deterministic hash-based train/val/test split.',
    tags={
        'count': str(len(records)),
        'classes': ', '.join(f'{k}={v}' for k, v in sorted(class_dist.items())),
        'splits': ', '.join(f'{k}={v}' for k, v in sorted(split_dist.items())),
        'source': 'image-collector',
        'testing': 'true',
    },
)
ml_client.data.create_or_update(asset)
print(f'Registered data asset {DATA_ASSET_NAME}:{VERSION}')
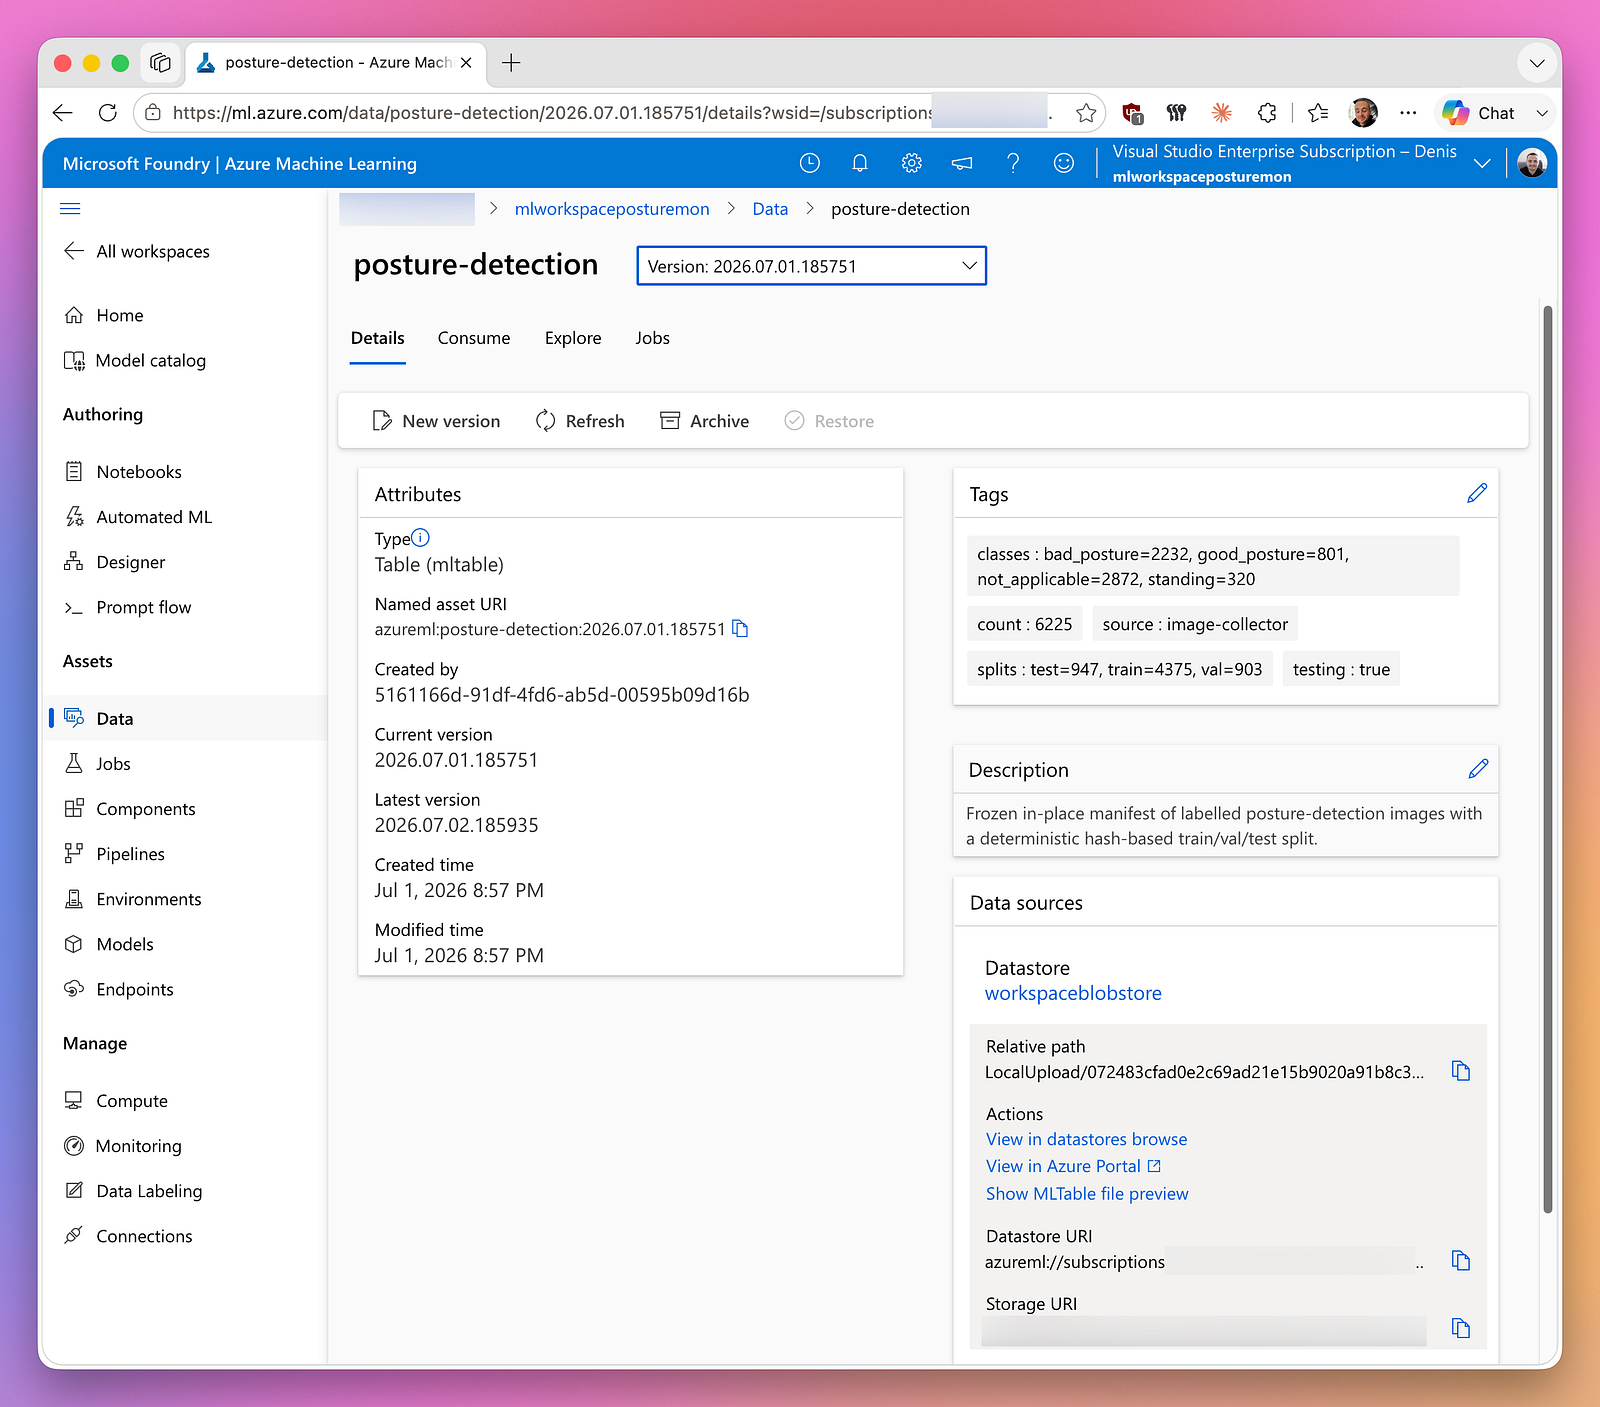
Inside of Azure ML Workspace, this is what a registered dataset looks like. It is logged under the date- and time-based version number, all tags containing the class-split, image count, etc. are clearly visible.
Model training
Model training begins by preparing MLflow tracking, setting it’s tracking URL to Azure ML Workspace, and also configuring YOLO to use its native MLflow integration. This is where “the magic happens” to make local training runs show up in Azure ML Workspace. By setting the MLflow tracking URI to the Azure ML workspace, all of the metrics, artifacts, etc. produced are being sent directly to the service, in real time
import os
import mlflow

# The workspace is the MLflow tracking server. Ultralytics' MLflow callback reads the tracking URI
# and experiment name from the *environment* (falling back to a local folder otherwise), so export
# them — not only set them via mlflow.* — or the per-epoch metrics would be logged locally instead
# of to the workspace.
tracking_uri = ml_client.workspaces.get(WORKSPACE).mlflow_tracking_uri
os.environ['MLFLOW_TRACKING_URI'] = tracking_uri
os.environ['MLFLOW_EXPERIMENT_NAME'] = DATA_ASSET_NAME
# Keep the run open when training ends so the same run also gets the test metrics and the model.
os.environ['MLFLOW_KEEP_RUN_ACTIVE'] = 'True'
mlflow.set_tracking_uri(tracking_uri)
mlflow.set_experiment(DATA_ASSET_NAME)

# Enable Ultralytics' MLflow callback so each epoch's metrics are logged into our run.
from ultralytics import settings as ultralytics_settings
ultralytics_settings.update({'mlflow': True})
Next I get the dataset I previously registered in Azure ML Workspace ready by downloading it to my local machine. This downloads each file previously prepared and listed in the manifest.jsonl file into the corresponding folder. The resulting folder structure is how YOLO models want their data to be prepared.
from pathlib import Path
from concurrent.futures import ThreadPoolExecutor, as_completed

# Download the versioned images into the YOLO classification layout: <root>/<split>/<label>/<file>.
# The fetches run concurrently across a thread pool because each blob is a small, independent,
# network-bound download; the sync ContainerClient is safe to share across threads.
dataset_root = Path(f'./dataset_{VERSION}')

def fetch(blob_name, label, split):
    dest = dataset_root / split / label / Path(blob_name).name
    if dest.exists():
        return
    dest.parent.mkdir(parents=True, exist_ok=True)
    with open(dest, 'wb') as f:
        f.write(container_client.download_blob(blob_name).readall())

with ThreadPoolExecutor(max_workers=32) as pool:
    futures = [pool.submit(fetch, *record) for record in records]
    for future in as_completed(futures):
        future.result()  # propagate any download error instead of silently skipping the image

print('dataset ready at', dataset_root)
Example of how the downloaded file structure looks like:
dataset_<version>/
├── train/
│   ├── bad_posture/
│   │   └── img_0001.jpg
│   ├── good_posture/
│   │   └── img_0002.jpg
│   ├── not_applicable/
│   │   └── img_0003.jpg
│   └── standing/
│       └── img_0004.jpg
├── val/
│   ├── bad_posture/
│   │   └── img_0005.jpg
│   ├── good_posture/
│   │   └── img_0006.jpg
│   ├── not_applicable/
│   │   └── img_0007.jpg
│   └── standing/
│       └── img_0008.jpg
└── test/
    ├── bad_posture/
    │   └── img_0009.jpg
    ├── good_posture/
    │   └── img_0010.jpg
    ├── not_applicable/
    │   └── img_0011.jpg
    └── standing/
        └── img_0012.jpg
Finally, model training starts right after setting some final metadata (e.g. the dataset version) in MLflow.
import torch
from ultralytics import YOLO

device = 'mps' if torch.backends.mps.is_available() else ('cuda' if torch.cuda.is_available() else 'cpu')
print('training on', device)

# One run per training: close any run left active by a previous run of this cell, then open ours.
# Ultralytics' callback logs each epoch into this active run; MLFLOW_KEEP_RUN_ACTIVE keeps it open
# for the evaluation/registration cell below.
if mlflow.active_run():
    mlflow.end_run()
mlflow.start_run()
mlflow.log_param('base_model', 'yolo26s-cls.pt')
mlflow.log_param('dataset', f'{DATA_ASSET_NAME}:{VERSION}')

model = YOLO('../models/yolo26s-cls.pt')  # pretrained small classification model
results = model.train(data=str(dataset_root), epochs=10, imgsz=224, device=device)Model evaluation and promotion
The first step is a clean evaluation on the held-out test split — the data the model never saw during training or validation. Running model.val(split=’test') hands back YOLO’s built-in metrics object, which is where top-1 and top-5 accuracy comes from and, more usefully, the confusion matrix for the test set. Keeping it on the same device as training just avoids shuffling the model between CPU and MPS. Top-1 accuracy is a fine headline number, but on its own it hides where the model is going wrong, so the built-in metrics are only the starting point. Everything more interesting gets derived from that confusion matrix in the next step.
from azure.ai.ml.entities import Model
from sklearn.metrics import cohen_kappa_score, matthews_corrcoef

# Evaluate on the held-out test split, on the same device as training.
metrics = model.val(split='test', device=device)
print('test top-1 accuracy:', metrics.top1)
Ultralytics’ classification val() only reports top-1 and top-5 accuracy, so everything else gets pulled out of the confusion matrix by hand. The idea is simple: for each class, the diagonal cell is the true positives, the rest of that class’s row and column split into false positives and false negatives, and everything else is true negatives. From those four counts you can build precision, recall, F1 and the false-positive rate per class, then take a plain mean across classes for the macro averages. Cohen’s Kappa and Matthews correlation coefficient are single whole-model scores rather than per-class, and since scikit-learn wants per-sample labels, the counts get expanded back into label lists first (the ordering inside a class doesn’t matter to either metric). One thing worth checking for your own setup: which axis of the matrix is “predicted” and which is “true” has changed between Ultralytics versions, and getting it backwards silently swaps precision and recall while leaving macro-F1 untouched — so it’s worth a one-line sanity check against a class you know, rather than trusting the axis labels alone.
# Ultralytics' classification val reports only top-1/top-5, so derive the rest from its confusion
# matrix. cm[predicted][true] holds the count per (predicted, true) pair.
cm = metrics.confusion_matrix.matrix.astype(int)
names = metrics.confusion_matrix.names  # {0: 'class0', 1: 'class1', ...}

# Per-class precision/recall/F1/FPR, each read off the confusion matrix:
#   TP = cm[i, i]                     predicted i and truly i
#   FP = cm[i, :].sum() - TP          predicted i but truly something else (rest of row i)
#   FN = cm[:, i].sum() - TP          truly i but predicted something else (rest of column i)
#   TN = cm.sum() - (TP + FP + FN)    everything else
per_class = {}
for i in range(len(names)):
    tp = cm[i, i]
    fp = cm[i, :].sum() - tp
    fn = cm[:, i].sum() - tp
    tn = cm.sum() - (tp + fp + fn)
    precision = tp / (tp + fp) if (tp + fp) else 0.0
    recall = tp / (tp + fn) if (tp + fn) else 0.0
    fpr = fp / (fp + tn) if (fp + tn) else 0.0
    f1 = 2 * precision * recall / (precision + recall) if (precision + recall) else 0.0
    per_class[names[i]] = {'precision': precision, 'recall': recall, 'f1': f1, 'fpr': fpr, 'support': int(tp + fn)}

# Macro average = plain mean across classes (every class weighted equally).
macro = {m: sum(c[m] for c in per_class.values()) / len(per_class) for m in ('precision', 'recall', 'f1', 'fpr')}

# Cohen's Kappa and MCC are single multiclass scores; sklearn takes per-sample labels, so expand the
# confusion-matrix counts back into label lists (order within a class is irrelevant to these metrics).
y_true, y_pred = [], []
for predicted in range(len(names)):
    for true in range(len(names)):
        count = int(cm[predicted][true])
        y_true += [true] * count
        y_pred += [predicted] * count
kappa = cohen_kappa_score(y_true, y_pred)
mcc = matthews_corrcoef(y_true, y_pred)

# Per-class table plus the macro and global scores.
print(f"{'class':<16}{'precision':>10}{'recall':>10}{'f1-score':>10}{'fpr':>10}{'support':>10}")
for name, c in per_class.items():
    print(f"{name:<16}{c['precision']:>10.4f}{c['recall']:>10.4f}{c['f1']:>10.4f}{c['fpr']:>10.4f}{c['support']:>10}")
print(f"{'macro avg':<16}{macro['precision']:>10.4f}{macro['recall']:>10.4f}{macro['f1']:>10.4f}{macro['fpr']:>10.4f}{cm.sum():>10}")
print(f"cohen kappa: {kappa:.4f}   matthews corrcoef: {mcc:.4f}")
The Ultralytics callback has already streamed the per-epoch metrics, training arguments, weights, and training curves into the active run, so what’s left is to attach the things it doesn’t know about: the test-split results. Each per-class precision, recall, F1 and FPR gets logged, along with the macro averages and the two whole-model scores, Kappa and MCC, so the full evaluation lives next to the run rather than only in the notebook output. The test-split plots get uploaded as artifacts under a test/ path, wrapped in a try/except so a failed upload doesn’t kill the run — though it’s worth making sure that “skipped” branch is loud enough to actually notice. Grabbing the active run handle here also sets up the next step: registering the model from the run, so the registered model links straight back to the run that produced it instead of being an orphaned file.
# The Ultralytics callback already logged per-epoch metrics, training args, the weights, and the
# training curves into the active run; add the test metrics + plots and register the model here,
# then close the run. The model is registered FROM the run (runs:/ path) so it links back to it.
# The dataset version is recorded as a param / model tag (not mlflow.log_input, which creates a
# duplicate data asset instead of referencing the existing one).
run = mlflow.active_run()
mlflow.log_metric('test_top1', float(metrics.top1))
for name, c in per_class.items():
    for m in ('precision', 'recall', 'f1', 'fpr'):
        mlflow.log_metric(f'{m}_{name}', float(c[m]))
for m, v in macro.items():
    mlflow.log_metric(f'{m}_macro', float(v))
mlflow.log_metric('kappa', float(kappa))
mlflow.log_metric('mcc', float(mcc))

# Upload the test-split plots (the callback already uploaded the training weights + curves).
try:
    mlflow.log_artifacts(str(metrics.save_dir), artifact_path='test')
except Exception as ex:
    print('test artifact upload skipped (non-fatal):', ex)
This is where “newest” and “best” get separated. Every freshly trained model starts as a challenger; the gate looks up the current champion — the prior version tagged role=champion and compares macro F1, the unweighted mean of the per-class F1 scores. If there’s no champion yet, this model takes the crown by default. If the challenger’s macro F1 beats the champion’s, it’s promoted; otherwise the existing champion stays put. The role isn’t just bookkeeping: the champion is tagged jetson=true, which is what tells the TensorRT converter (a small service running on my Jetson, used to convert trained models to Jetson-compatible TensorRT format) to compile that version for the device, so promotion is what actually reaches production.
# --- Champion/challenger promotion, gated on macro F1 ---
# The newly trained model is a challenger. Find the current champion (a prior version tagged
# role=champion) and compare macro F1. Higher F1 wins: the winner is champion (jetson=true, so the
# TensorRT converter compiles it for the Jetson); a losing challenger is jetson=false and the
# converter skips it, so production keeps the current champion. Exactly one champion exists at a
# time; every other trained version is a challenger.
new_f1 = float(macro['f1'])
champion = None
for v in ml_client.models.list(name=DATA_ASSET_NAME):
    candidate = ml_client.models.get(name=DATA_ASSET_NAME, version=v.version)
    if (candidate.tags or {}).get('role') == 'champion':
        champion = candidate
        break

if champion is None:
    role = 'champion'
    print(f'No champion yet; this model becomes champion (F1 {new_f1:.4f}).')
elif new_f1 > float(champion.tags['test_f1_macro']):
    role = 'champion'
    print(f'Promoting: challenger F1 {new_f1:.4f} > champion F1 {float(champion.tags["test_f1_macro"]):.4f}.')
else:
    role = 'challenger'
    print(f'Keeping champion: challenger F1 {new_f1:.4f} <= champion F1 {float(champion.tags["test_f1_macro"]):.4f}.')

is_champion = role == 'champion'
With the role decided, the model gets registered. The key detail is the runs:/ path: registering from the run rather than from a local file means the model in the registry links straight back to the run that produced it, carrying its full lineage instead of arriving as an orphaned .pt. Every metric that mattered goes on as a tag — the macro scores, Kappa, MCC — so you can compare and gate future versions without reopening each run, and test_f1_macro in particular is what the next promotion reads. The jetson tag is the deployment switch: only the champion is marked for the TensorRT converter to compile and push to the device. Finally, if this run promoted a challenger over a sitting champion, the old champion is demoted so exactly one stays crowned.
# runs:/ path links the registered model back to this run; the callback logs the weights under weights/.
registered = ml_client.models.create_or_update(Model(
    path=f'runs:/{run.info.run_id}/weights/best.pt',
    type=AssetTypes.CUSTOM_MODEL,
    name=DATA_ASSET_NAME,
    description='YOLO26s-cls posture classifier.',
    tags={
        'dataset': f'{DATA_ASSET_NAME}:{VERSION}',
        'framework': 'ultralytics yolo26s-cls',
        'test_top1': f'{metrics.top1:.4f}',
        'test_precision_macro': f"{macro['precision']:.4f}",
        'test_recall_macro': f"{macro['recall']:.4f}",
        'test_f1_macro': f"{macro['f1']:.4f}",
        'test_fpr_macro': f"{macro['fpr']:.4f}",
        'test_kappa': f'{kappa:.4f}',
        'test_mcc': f'{mcc:.4f}',
        'role': role,
        # jetson marks this model for TensorRT compilation; only the champion is compiled + deployed.
        # imgsz/half are the export params the model-tensorrt-converter reads.
        'jetson': 'true' if is_champion else 'false',
        'imgsz': '224',
        'half': 'true',
    },
))

# If we promoted over an existing champion, demote it so exactly one champion remains. It is no
# longer the latest version the converter looks at, so production is unaffected.
if is_champion and champion is not None:
    champion.tags['role'] = 'challenger'
    champion.tags['jetson'] = 'false'
    ml_client.models.create_or_update(champion)
    print(f'Demoted previous champion {champion.name}:{champion.version} to challenger.')

mlflow.end_run()
print(f'Registered model {registered.name}:{registered.version} as {role}.')
Looking inside Azure ML Workspace
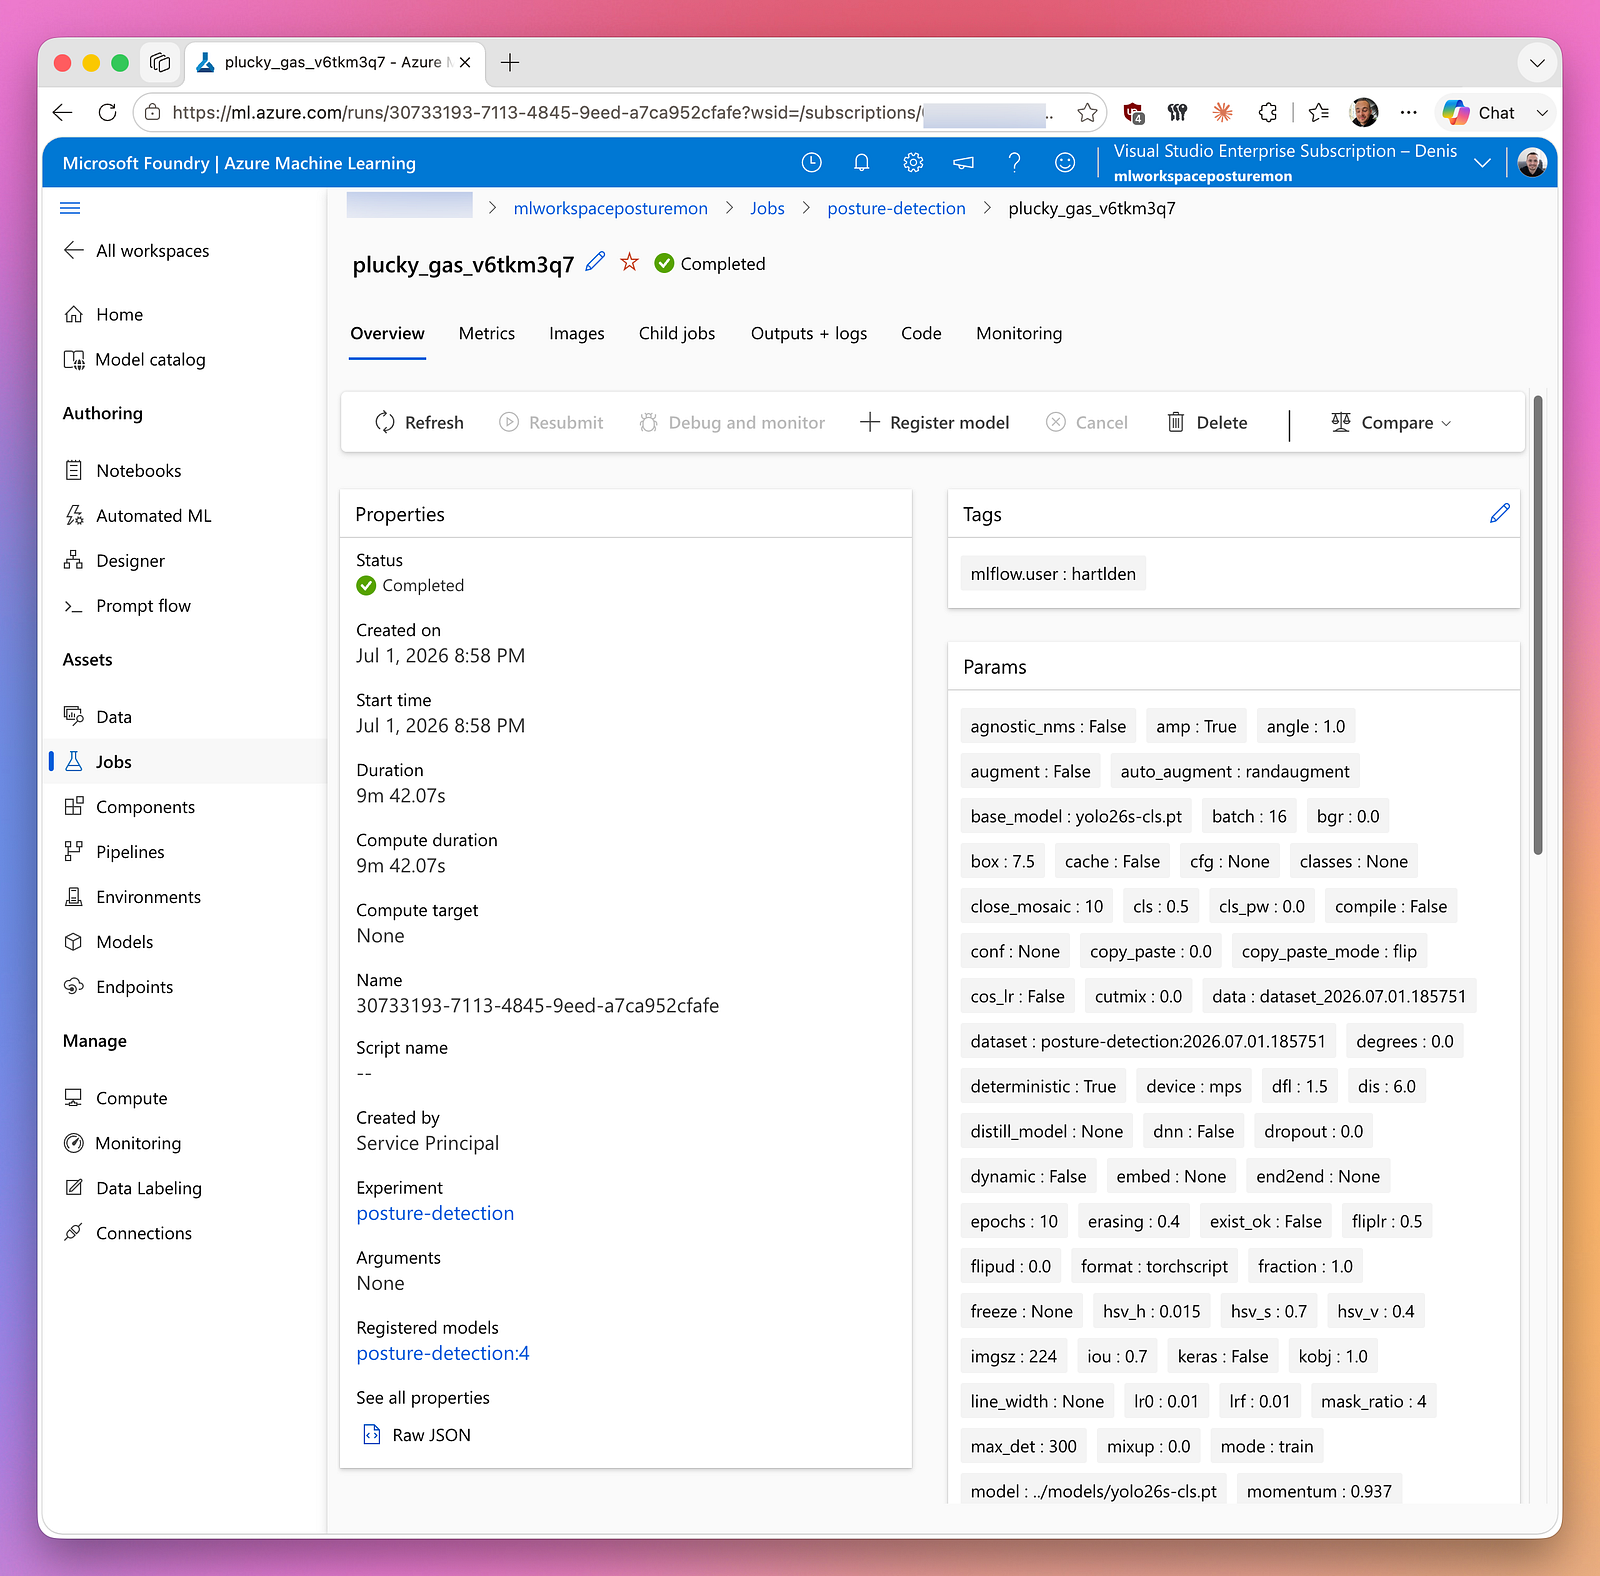
The training- and validation run just described gets logged in Azure ML Workspace as a job. A job’s overview page shows several facts about the run, including things like the job’s duration and all parameters. It also shows which model is linked to the job, providing full lineage from dataset → job → model, but with some caveats to be honest. For example, the dataset → job link only works via manual tags on local training. This would work better on cloud training directly in Azure ML.
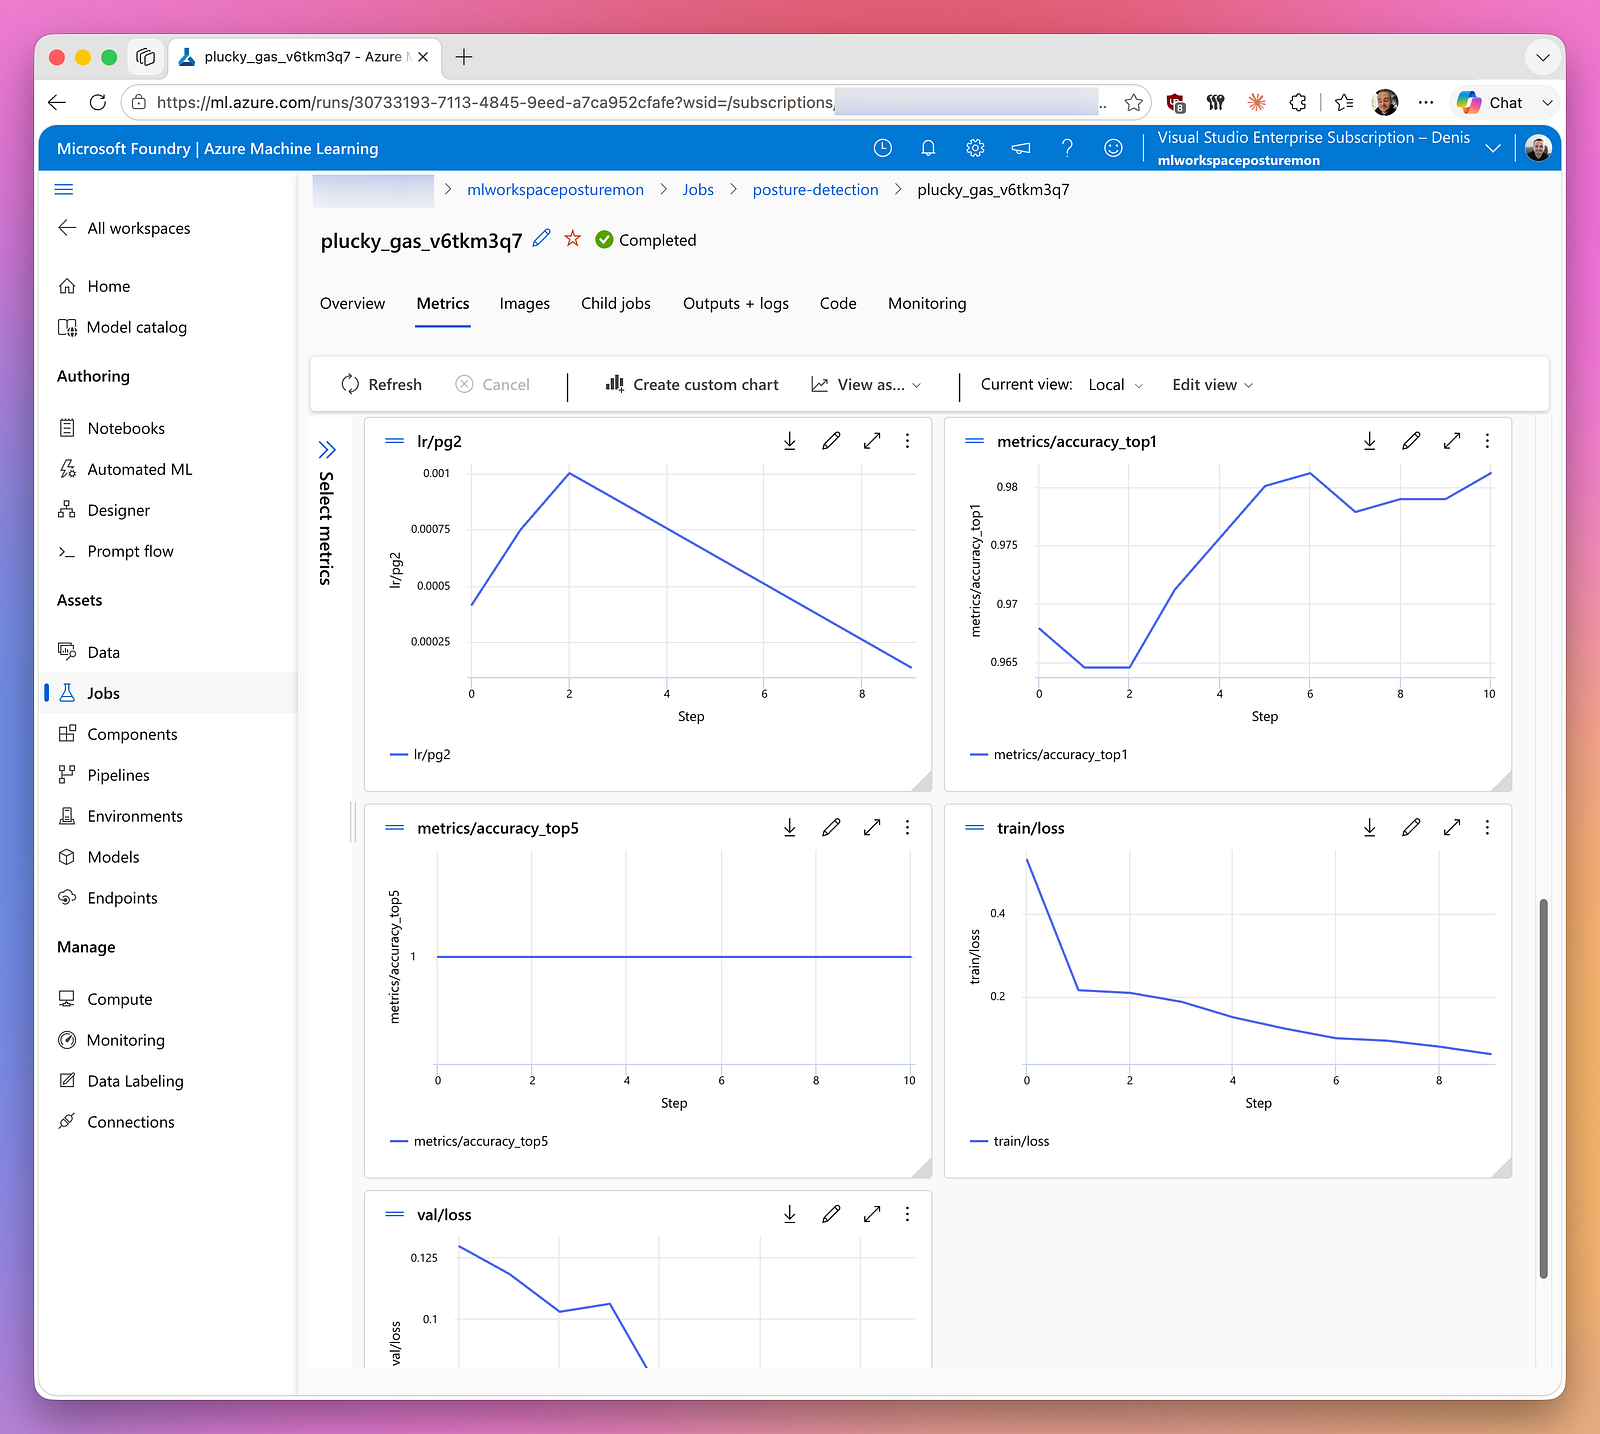
The metrics tab shows every value logged during training and evaluation, and because MLflow streams them from the local run, the charts fill in live while training runs on my Mac. The pair worth reading first is train/loss and val/loss: training loss drops fast early (roughly 0.5 down toward 0.1) and the gap between the two curves is your overfitting signal. As long as val loss falls alongside train loss the model is still generalizing; the moment train keeps dropping while val flattens or rises, overfitting is setting in. metrics/accuracy_top1 is climbing from about 96.5% to 98%, while metrics/accuracy_top5 sits pinned at 1.0 and is meaningless here. With only a few posture classes the right label is always in the top five.
The metrics shown are only a few examples, this tab of course shows every metric logged by MLflow, including custom metrics explained earlier.
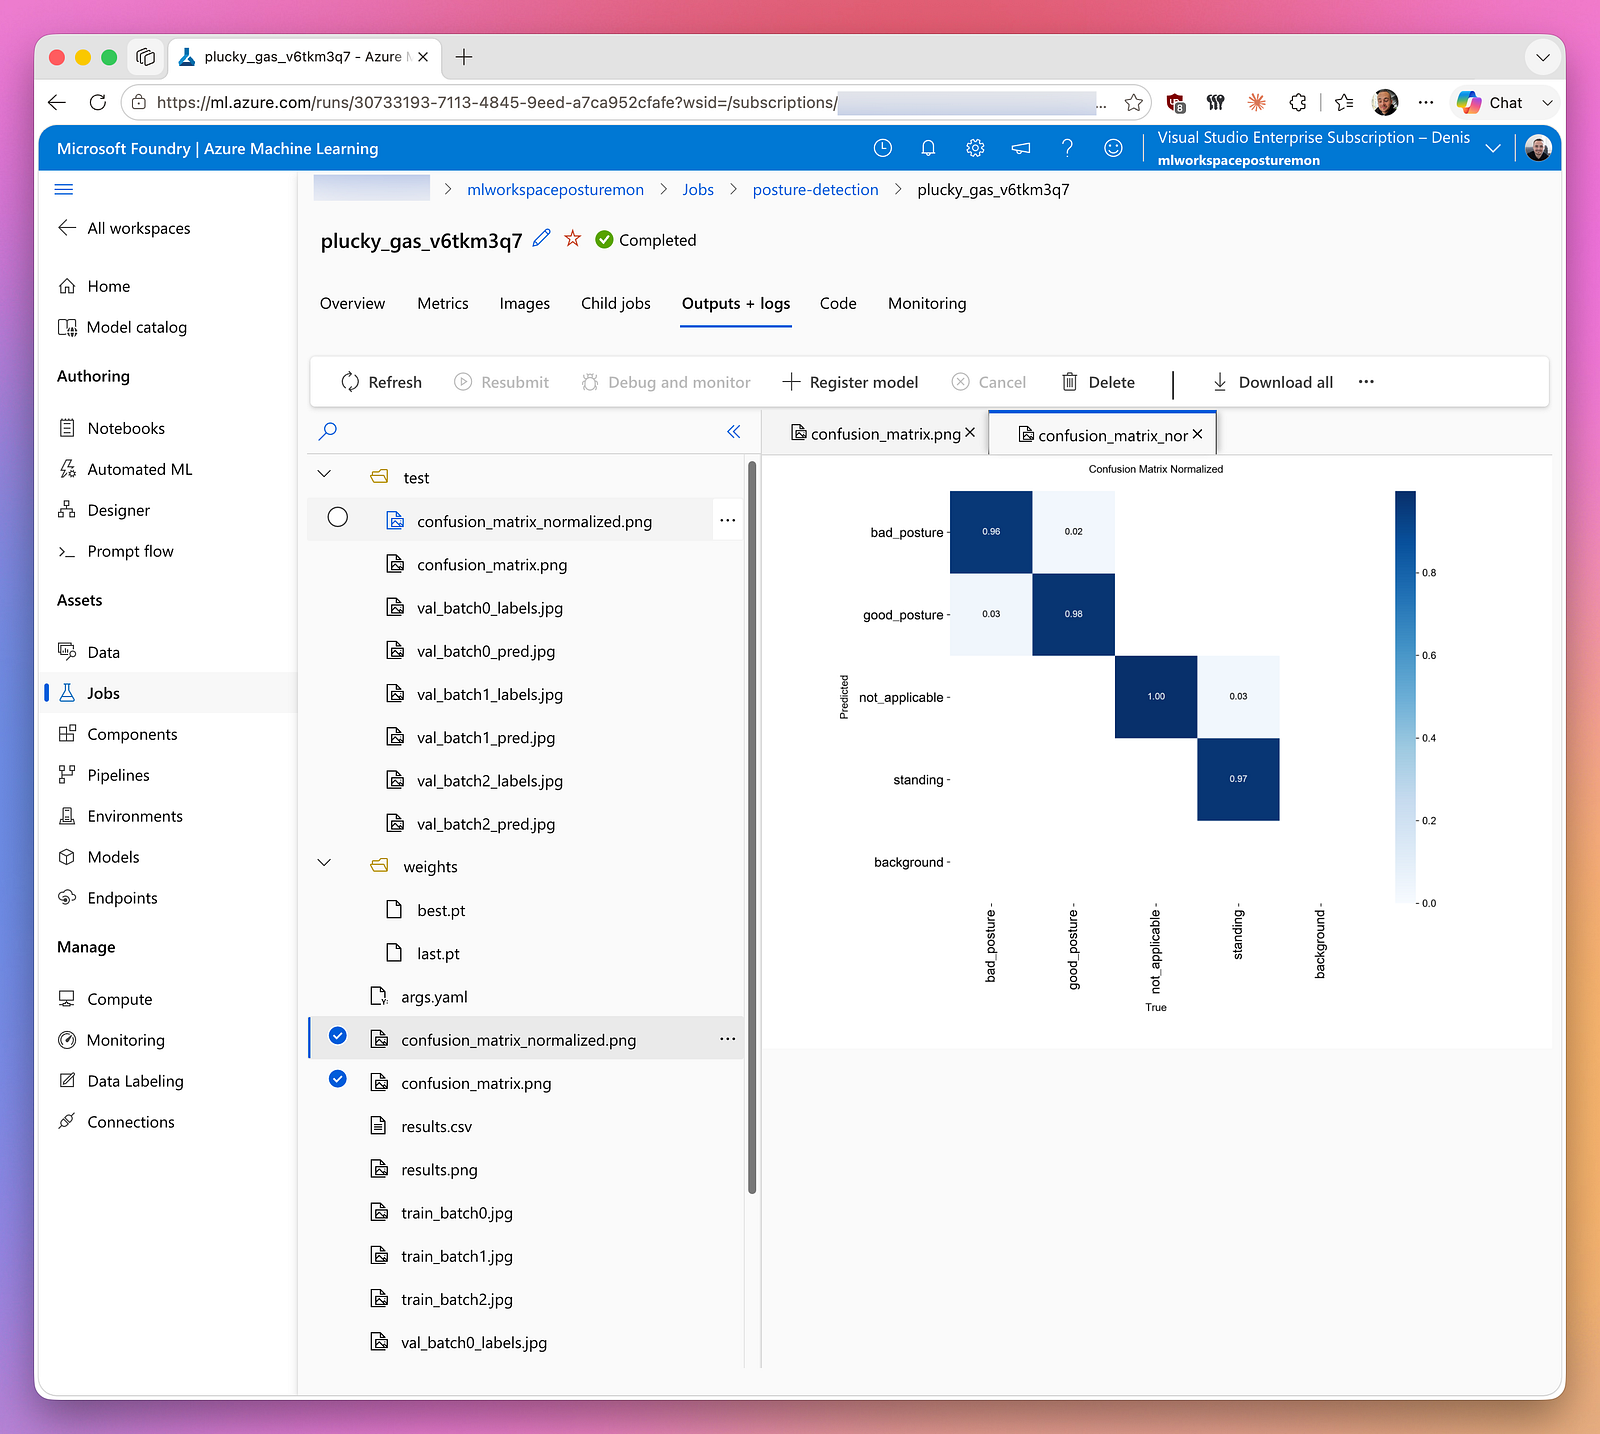
The Outputs + logs tab holds every artifact uploaded with the job, and it’s worth knowing which ones earn your attention. The weights/ folder is the payoff: best.pt is the trained model I register and deploy, last.pt is just the final epoch. The confusion matrices are how I judge quality per class: the normalized one shown here reads down each predicted row, and a strong model lights up the diagonal, which this one does (bad_posture 0.96, good_posture 0.98, not_applicable 1.00, standing 0.97). The off-diagonal cells are the mistakes worth caring about, like the 0.03 leaking between good and bad posture. Alongside those, results.csv and results.png track metrics per epoch, and the train_batch* / val_batch* images let me eyeball that labels and predictions actually line up. The raw confusion_matrix.png is the same data in absolute counts, which is handy when a class has very few samples and percentages flatter it.
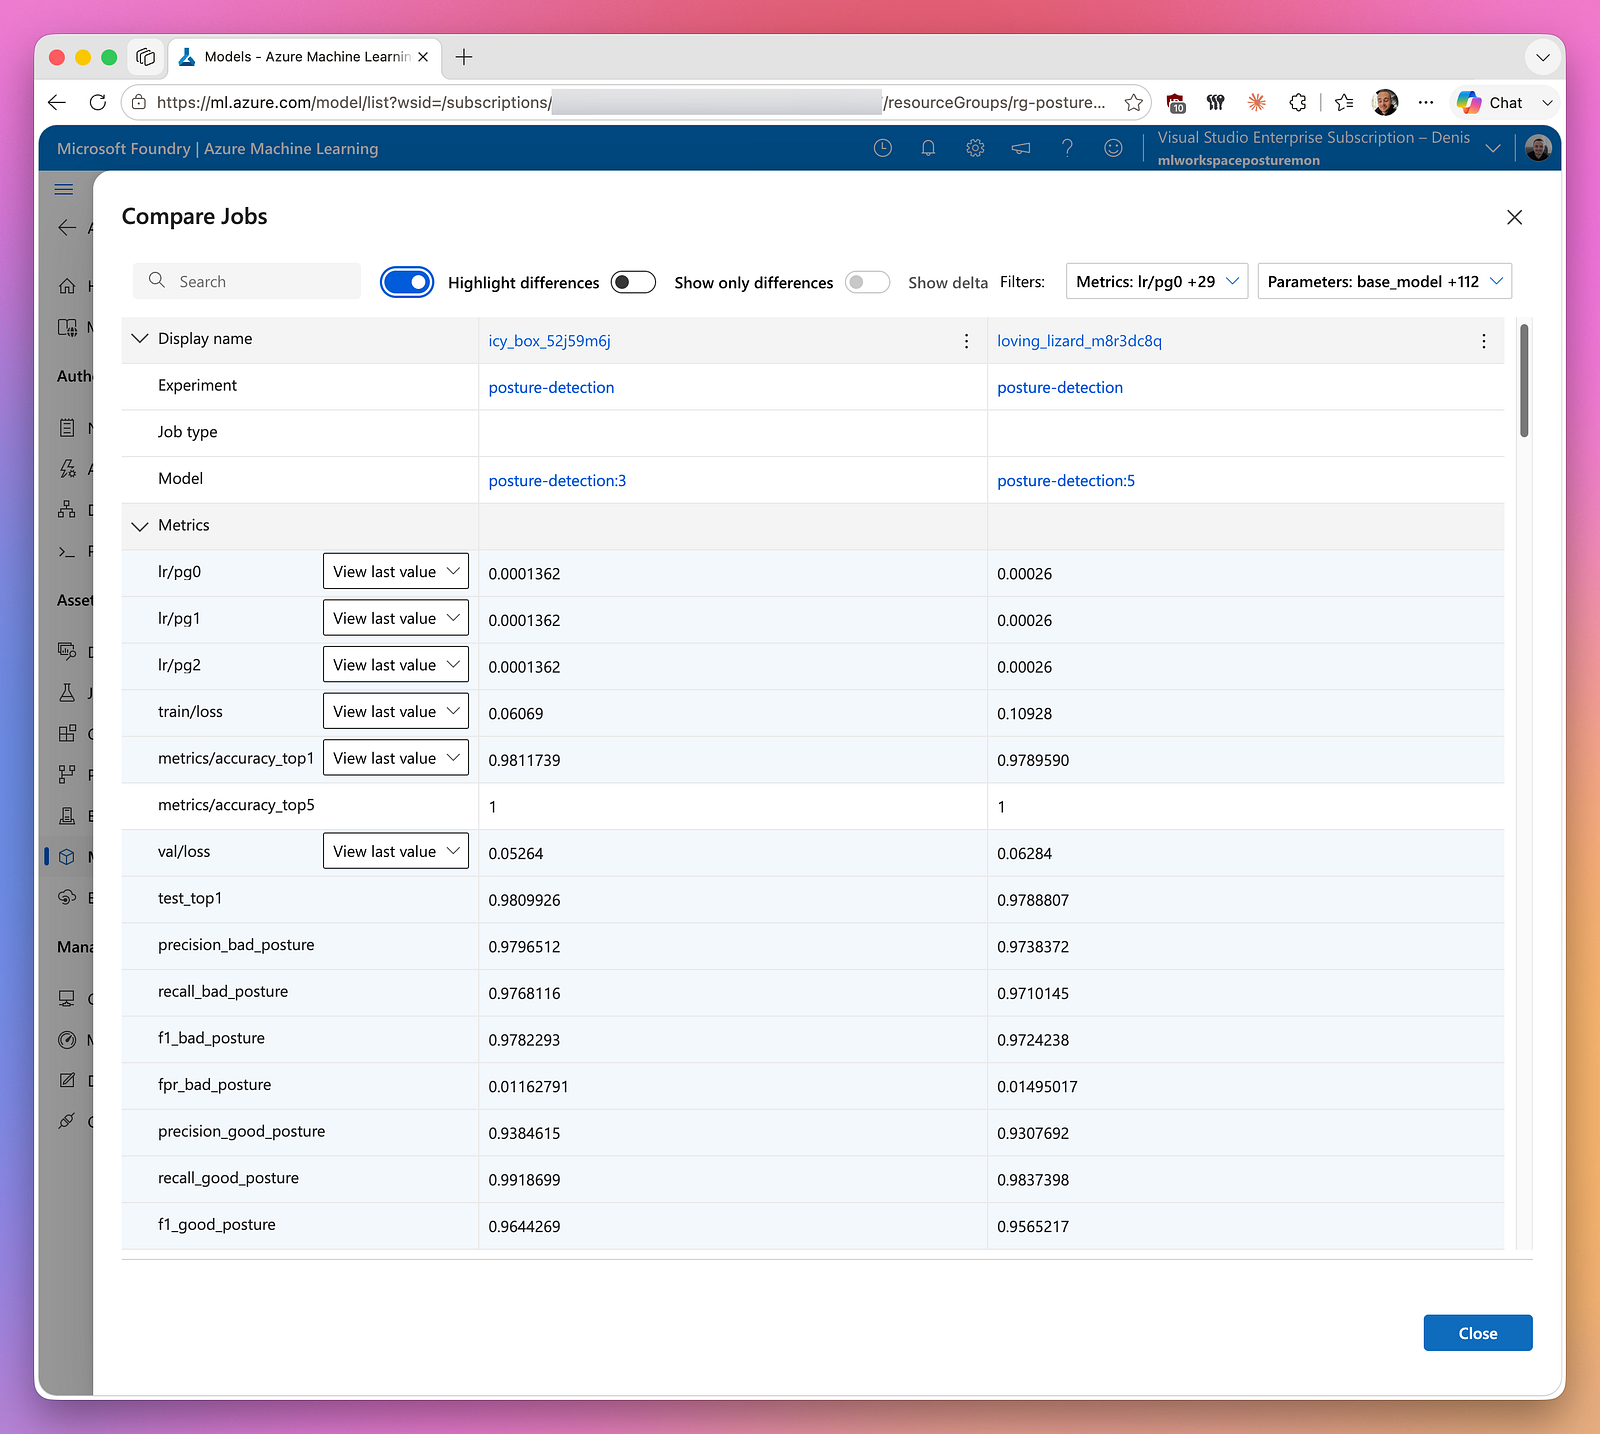
Azure ML also lets you compare two runs side by side, which is what makes a champion/challenger decision concrete rather than a guess. Here icy_box_52j59m6j (registered as posture-detection:3) sits next to loving_lizard_m8r3dc8q (posture-detection:5), and with "Highlight differences" on, the metrics that moved stand out. The first model wins on nearly everything that matters: higher top-1 accuracy (0.981 vs 0.979), lower train and val loss (0.061 vs 0.109, 0.053 vs 0.063), and better per-class scores, including f1_bad_posture (0.978 vs 0.972) and a lower false-positive rate on bad posture (0.0116 vs 0.0150). Since my promotion gate compares macro F1 and bad_posture is the class I care most about catching, the older run is actually the stronger model, so it stays champion and the newer one does not get promoted. That is the whole point of tracking this in one place: promotion follows the numbers, not whichever run happened to finish last.
Wrapping up
Hopefully you found this little writeup about using Azure ML Workspace to track and version ML work helpful and interesting. If you did, I’d really appreciate if you share this with your best ML buddy or favorite colleague 😉
Especially the option to also track local runs and have them fully transparent and traceable is what sold me. This really was one of those “ah-hah!” moments and super satisfying.
What I covered in this post of course was just a tiny bit of what the Azure ML suite has to offer. I didn’t even touch on topics like compute, model serving, automated ML, … For me personally, I will stick to local compute for now, as my hobby projects don’t justify expensive cloud compute (and I like to see my hardware break a sweat from time to time 😅). But even so, I think I can get more value out of the platform by tracking advanced metrics per run, getting deeper insights into model performance through training runs, overfitting, etc.
Anyway, enough yappin’ for today. Thanks for taking the time to read this post, I hope you enjoyed!
Take care! 👋
Further reading
- GitHub gist of the full Jupyter notebook: https://gist.github.com/denishartl/0a59b7c606d783f849654a2a6430cab5
- Azure ML documentation: https://learn.microsoft.com/en-us/azure/machine-learning/?view=azureml-api-2
- Blog category containing all posts related to the posture monitor project: https://www.denishartl.com/yolo-posture-detection-continuous-learning/
- MLflow: https://mlflow.org/
- YOLO MLflow integration: https://docs.ultralytics.com/integrations/mlflow#introduction